
Over the past three weeks, I have been journaling my home-bake sourdough journey. From educating myself to the first home-bake, and during and after each subsequent home-bake, there are always learning moments. These are additive and are slowly leading to more flavourful, better looking and more consistent bakes. However – and it is definitely a part of the sourdough narrative – sourdough is “complex-simplicity”
Sticking to the professionals advice, I am following a consistent schedule, ingredients, hydration levels and bake. There are as many methods and schedules as there are advisory websites and Youtube videos (eg The Ballerina Farm water method), however, I am sticking with the fundamentals of Culinary Exploration’s scrapings method and schedule. I have two schedules I am exploring. An morning retarded and an evening ambient, before school / work home-bake.
Morning, evening, morning schedule (two retards): Deed the start the night before, Next morning, mix and autolyse, fold, bulk ferment-retard. Home from work, fold-prove – back in the fridge, retard. Next morning, shape and bake.
Evening and morning schedule (ambient and retard): Feed the starter in the morning. Home from work, mix and autolyse, fold, ambient bulk ferment, retard (11pm-8am), shape and bake. (No need for a morning prove, it had proven the night before and overnight).
What a difference a little patience makes.
| Small (3-3.5L) | Medium (3-4L) | Large (4-5L) | |
| Strong white bread flour* Water Starter Salt | 388g 257g 98g 8g | 446g 296g 113g 9g | 504g 334g 127g 10g |
Morning dough mix retarded
- Applying a scrapings method and adapting to my work schedule and baking around 72% hydration
- I feed my starter the evening before mixing the dough in the morning – 55g water and 55g flour, weigh and prep the flour in a large open metal bowl, separately weigh the water and salt
- Before my early morning walk 5:45am, I add (almost all) the water to the flour and mix the dough.
- I give it it’s first folds with the bench scraper (it is super sticky) to incorporate the flour and water. Remember the temperature of the water can be used to adjust for the temperature of the environment. The dough should be around 28C. I then head out on my 45-50 minute walk.
- Back from the walk, 6:45am I build some strength – stretch and fold.
- Then I add the salt and the last of the water. The salt adds flavour and strength, changing the texture of the dough almost immediately. Ideally I would start the bulk fermentation, however, I have to go to work. To control and slow or retard the fermentation, I move the the dough to the top of the fridge during the long day. In my case 7am-4:30pm (when my daughter gets home from school and takes it out), however you can retard your dough for up to 24hrs.
- That evening, on arriving home around 5:30-6pm, I give the dough a strength-fold, then leave it out to nearly double in size. Until it is 50-75% of it’s original size. I give it another strength fold – getting progressively more gentle with the dough as not to lose volume.
- Now – this is the point where I am investigating. How much strength is needed?
- Are we ready to bake? When pressing the dough, it “answers you back in a considered way” – I love that explanation! Once doubled in size (50-75%), “take the dough for a short bench walk,” to create tension, before shaping the dough, dusting with flour (rice flour is apparently very good), and gently placing it in a banneton and back into the fridge over night.
- Now I bake two loaves and gift one (one small, one large), I need one small and one large banneton and Dutch oven. One small and one large, as two large (W 20cm) Dutch ovens do not fit in my 47cm oven.
- Remember, the doughs will expand and should not fill the bannetons.
- Next morning, pre-heat the oven whilst you prepare and score your dough (I have found a retarded dough is easier to work with)
- Sharp lame or razor (or scissors)
- Smooth surgeon-like cutting action, low angle (less than 45)
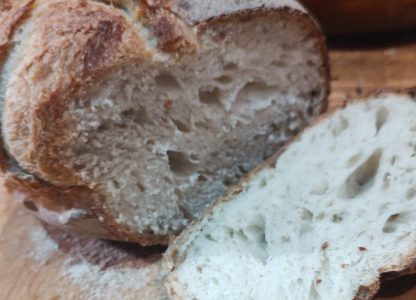
- In search of that Instagram ‘spring,’ that ‘ear’ is the goal
- The steam helps encourage that ear. To spray or not to spray with water? I am investigating.
- Bake in a pre-heated Dutch oven – 230C.
- Now turn the oven down and baked at 180C for 40-60 minutes.
- Then with the lid off until the desired mahogany brown.

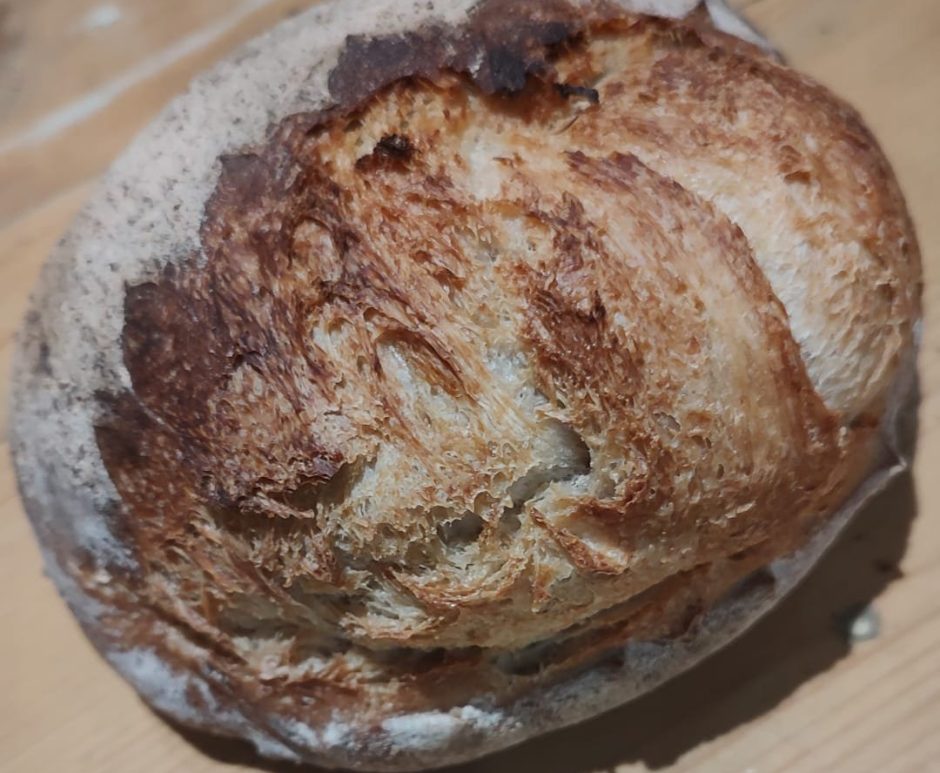
Baked longer for a darker crust. Better aeration. Allowed to cool.
Giving the dough mix a good hour to rest, whilst out on my morning walk, meant I could not tinker with the dough and that the flour had fully absorbed or the water.
Returning home from the walk, visually not much has changed, however the dough feels much stronger, the first folds more elastic and the dough smoother. With the flour fully hydrated, enzymes in the flour that stimulate the proteins to start gluten development, are activated – hence the difference feel. Then adding the salt – the dough felt markedly stronger.
Now it is time to take the dough for a walk.
Now – add the salt and the texture changes almost instantly, tightening the gluten network, the dough feels less elastic, less forgiving.
Knowing the dough is ready. Take a small ball of the dough. Hold it between your thumb and first two fingers and stretch it into a square. Keep on stretching until it becomes a thin film in the middle without breaking. The dough must be thin enough to pass light through it. If this is achieved without any tearing then your dough is properly kneaded.
It is worth noting here, that by adjusting the amount of starter, you can influence the time your dough requires bulk fermenting.. The more starter you use, the more microorganisms you are introducing, the faster the rate of fermentation.
Evening dough mix retarded
Again, applying a scrapings method, I feed my starter in the morning. As soon as I am home (on an early day it is 5pm), I mix the dough. Wait, strength and fold x3 before moving the dough to the top of the fridge overnight. Shape, bake in the morning.
Shaping, stitching and tension
There are about as many different ways to approach the final shape and shaping of a sourdough as there are methods and schedules! However, the two main things I have learnt bakers are trying to accomplish during a final shaping is to build tension on the surface of the dough and promote “oven spring.” This helps the dough hold it’s shape (more important with softer dough mixes) and improve “oven spring.” Second, the further into the process you go, the more care you give the dough as not to lose volume. That there really is two components to the dough – the aerated dough and the surface of the dough itself. In search of more “spring,” I have really invested time in developing my shaping and stitching techniques.
Time to practice and share!
Pingback: Home-baked bread to home-school sourdough (part I) – Edventures
Pingback: Home-baked bread to home-school sourdough – impatience and ambition – Edventures
Pingback: Home-baked bread to home-school sourdough (part x) In search of ‘spring’ – Edventures
Pingback: Home-baked bread to home-school sourdough (part iv) before baking – Edventures